

During our recent renovations, we had additional recessed lighting installed in our kitchen and two bathrooms. Other than skylights, we wanted changes that promoted brightness and lots of light.
What to Know About Installing Recessed Lighting - by HOUZZ.com
Find out what can-light installation costs, how long it takes and what types of lights would work for your home
Installing recessed lighting is a wonderful way to improve both the look and function of your home. But it’s not something most homeowners will want to tackle themselves, given the dangers in handling electrical wire as well as the changes in lighting that have taken place in recent years.
A professional lighting designer or electrician can help you decide how many recessed lights you’ll need and what type, and will make sure they’re appropriately installed. Here’s an overview of how to install recessed lighting by working with a pro, plus a short guide to the types of lights you may be considering.
What Is a Recessed Light?
Recessed lighting, also known as can or pot lighting, is a type of downlighting that sits flush or nearly flush with the ceiling. The lights consist of a housing, which is the portion that inserts into the ceiling, and the trim, which is the part you can see when the light is installed.
Some recessed cans work with only a specific type of bulb — such as incandescent or LED — while others work with a variety of bulbs. Some recessed cans come with the light bulb included while many others do not. A pro can quickly help you decide which type of recessed can light is right for your room.
How Much Does It Cost to Install Recessed Lighting?
Professional electricians typically charge $125 to $200 per installed light, including both labor and materials. A good electrician can install up to 12 can lights in a single day. Lighting designers charge a design fee, which can be an hourly rate ($125 to $250 is common) or a flat project rate that could be $2,500 or more. Some lighting designers who sell products may offer a discount on their design work if you buy through them, but those who do should not be considered independent and are more likely to recommend their own products.
What’s Involved in Installing Recessed Lighting?
The assessment. The first step is for an electrician or lighting designer to assess your home. Lighting designers have sophisticated knowledge about the types of recessed (and other) lights available and the effects they create. Lighting is an area where regulations as well as products are constantly changing, so the expertise of a designer can be helpful in ensuring that your lights, wiring and dimmers are all compatible and built to last. A lighting designer may develop a plan for your lights based off blueprints or may visit your home, or both.
Whether you work with a lighting designer or not, you’ll certainly work with an electrician. Electricians can install the lights and recommend specific lights for your situation, often based on the type of product they prefer to work with. In the initial home visit your electrician will evaluate the height and slope of your ceiling, whether it has insulation and whether there is accessible space (like an attic) above it. The electrician will also find the nearest power source and determine how much power is available on the nearest line. The pro will likely also measure the room, says David Glover, journeyman electrician with Pacific Coast Electricians in Pleasanton, California.
The plan. The size of the room, the size of the lights you choose and the type of bulb you prefer will all factor in to how many recessed lights you’ll need. Your professional can lay out the decisions you’ll need to make on:
- Can size, measured in terms of the diameter of the light. Four- or 6-inch-diameter lights are most common, but you can purchase lights as small as 2 inches.
- Bulb type, meaning compact fluorescent (CFL), light-emitting diode (LED), incandescent or halogen. Different states have different regulations about the light itself — California, for instance, requires high-efficiency lighting, effectively meaning LEDs, says Tal Mashhadian, owner of Lite Line Illuminations in Los Gatos, California. Your state may be different. Also keep in mind that CFL bulbs contain mercury and are less efficient than LEDs.
- Color temperature, meaning how warm (amber) or cool (blue) the light is. The color temperature of your lightbulb will affect the type of glow it casts about the room. This story offers a good summary.
- Can placement, meaning how far apart you place your recessed lights. It used to be generally true that smaller cans spread light over a smaller surface area and larger lights pushed light out over a broader surface area, so the size of a can affected their placement. However, today even very small LED recessed lights can have a broad spread, so keep in mind that the type of bulb you choose affects placement as well.
- Housing and trim type, meaning the parts of the light that go around the bulb (or light-producing part of the light) itself.
- Dimmer switches, which allow you to control the brightness of your light.
If you do buy materials yourself, be sure you know exactly what you need. For example, some dimmer switches work with only one type of light bulb while others can work with multiple types. “You might as well buy a dimmer that will control incandescent, halogen and LED,” advises Jeff Laskowski, of Reddy Watt Electrical in Gig Harbor, Washington. Also, not all bulbs are dimmable, so be careful with that. Incompatibility can create a fire hazard, says lighting designer Aaron Humphrey, of Alpenglow Lighting Design in Carbondale, Colorado.
Recessed lighting installation. On installation day the electrician will cut holes in the ceiling, insert the recessed lights and string wiring between them. If you have an attic, the pro will likely install the wiring from above. If you don’t have an attic or your ceiling is beneath a second story, the electrician will need to string the wiring from below.
If there is no accessible space above the ceiling, the electrician may cut extra holes for stringing the wire. Some electricians will patch these holes themselves, others leave that to a contractor or handyman, so before you hire you may want to ask about that pro’s standard practice.
The pro will connect the wiring to a circuit to give the lights a power source. Typically the electrician will wire the lights so a single light switch turns on the whole set.
Surprises That May Come Up When Installing Recessed Lighting
If you have an older home, you may have old wiring that will need to be replaced. Cloth wiring — which is wrapped in cloth, in contrast with modern wiring that is coated in plastic — was used in homes until around 1960. If exposed to light, moisture or heat, the cloth can decay and the raw wiring can become a dangerous fire hazard. Improperly installed aluminum wiring can also be unsafe. If an electrician recommends replacing part or all of your wiring, that would increase the cost of your lighting project.
However, merely having cloth or aluminum wiring doesn’t automatically mean you’ll need to replace it — though some electricians will automatically recommend replacing aluminum wiring. Other electricians will work with both types of wiring when they are in good condition and properly installed, and they will even connect modern wiring to the older wiring using junction boxes to join the wires.

Recessed Light Housings and Trims
There are a variety of recessed light housing types to address different ceiling situations, as well as a variety of trims for different functions and looks. Here’s a basic guide to help you understand the options.
Types of Housings
There are a variety of recessed light housing types to address different ceiling situations, as well as a variety of trims for different functions and looks. Here’s a basic guide to help you understand the options.
Types of Housings
- New construction housings are designed to be nailed onto the wood structure in a ceiling and must be installed when the ceiling is still open before the drywall goes up.
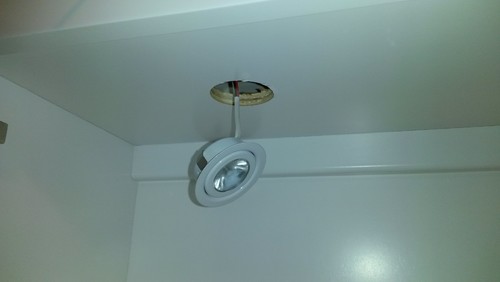
- Remodel housings are designed to go into the ceiling after drywall has already been installed. The electrician will cut a hole in the ceiling and slide the housing into the hole. Pushing integrated latches on the housing’s back expands the latches so they hold the can secure in the drywall.
- IC-rated housings can be safely placed in ceilings where there is insulation.
- Non-IC-rated housings must be at least 3 inches away from insulation.
- Airtight housings prevent cold air in the room from leaking into the ceiling cavity above, where air is not cooled. This reduces condensation, cold and mildew, increases energy efficiency and can save money on energy bills.
- Shallow ceiling housings fit into ceilings where the ceiling joists are shallower than the typical 2-inch depth.
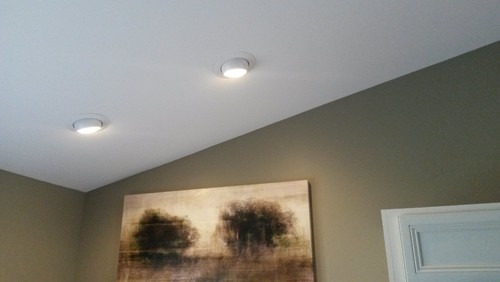
- Slope ceiling housings have a bulb that faces down with trim that fits the angle of the sloped ceiling.
- Ultra thin or wafer housings can be used where space is tight near ductwork or piping.
Types of Trim
- Baffle or open trim is the most popular trim and features ridged surfaces that absorb excess light, reducing glare. White is a popular choice but multiple colors are available.
- Eyeball or gimbal trim can be directed toward a specific area. Eyeball trim protrudes “like a frog’s eyeball,” says Eric Fries of Eric’s Electric Service Pros in Woodbine, Maryland. A regressed eyeball directs light but does not protrude. A gimbal looks like the head of a cylinder and has less range of motion than eyeball trim.
- Wall wash trim is designed to direct light away from the room so it only hits the wall. “It’s designed for a gallery or a long hallway with a lot of pieces of art,” Mashhadian says.
- Shower trim encloses the light so it can be safely used inside a shower or other location where it may come in contact with moisture. Shower trim features a lens that covers the light bulb.
Read full Houzz article H E R E

Ye are the light of the world.
A city that is set on an hill cannot be hid.

**


No comments:
Post a Comment